Shop All

Free or Fixed Shipping

On most products!

Need Help With Installation?

With decades of field experience we'll walk you through each step of your installation.

Field Tested

Quality products, lowest prices guaranteed!

Price Match

Found a better price? We'll match it.  Contact us for our price match guarantee!

Free or Fixed Shipping

On most products

Need Help With Installation?

With decades of field experience we'll walk you through each step of your installation.

Price Match

Found a better price? We'll match it.*

0

Downspout First Flush Water Diverter PLUS 4"

WDDP111
$62.10
In stock
1
Product Details
Brand: Rain Harvesting

FIRST FLUSH DIVERSION FOR RAIN HARVESTING!

NOTE: We only recommend first flush diverters in warm climates. Using these in winter climates could result in the unit breaking if the standpipe isn't fully drained during freezing temps. For winter climates, consider using our Wisy Vortex Filters or our Monjolin Filters in lieu of first flush.

Downspout First Flush Water Diverters improve water quality and reduce tank maintenance by preventing the first flush of water, which may contain roof contaminants, from entering the tank. They help ensure cleaner water is available for use, which protects rainwater pumps and internal household appliances such as clothes washing machines, toilets, hot water systems, etc.

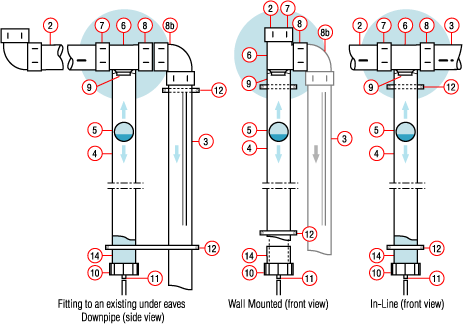
The First Flush Plus Tee’s specially designed inlet solves the problem of fast-moving dirty water “skipping” over the first flush chamber, ensuring the dirtiest water does not enter your tank.

*Not recommended for winter climates*

FEATURES AND BENEFITS

  • Diverts water containing particles of organic and inorganic matter into collection chambers installed on each downpipe
  • Patented First Flush Plus tee prevents dirty water "skipping" over the traditional T-junction gap during heavy rainfall.
  • Adjustable diverter chamber pipe length
  • Automatic reset valve drains after rainfall events
  • Comes in a kit
  • Transparent, rapid release exit funnel

INSTALLATION INSTRUCTIONS

1. Determine the length of 4” pipe required for your first flush diversion chamber. As a rough guide, 3 ft of 4” pipe holds approximately 2.3 gallons of water. Ensure all cut edges are clean and smooth.
2. The First Flush Plus tee can be installed in the horizontal or vertical orientation to suit your installation. The outlet must be accessible for maintenance and inspection.
3. Select the orientation of the First Flush Plus tee appropriate for your chosen installation point. This will determine which socket on the First Flush Plus tee will attach to your diversion chamber. (Examples: if you’re installing your First Flush Plus beneath a horizontal pipe, the arrow marking the direction of water flow should be oriented in the direction of flow, meaning the socket on the “branch” of the “T-junction” will attach to your diversion chamber. For installations where the “branch” is orientated horizontally, the arrow marking the direction of water flow should point UP so the water will initially flow into the diversion chamber.
4. Orient the ball seat so it will fit inside the First Flush Plus tee socket that will attach to your diversion chamber, then apply solvent weld glue and press it hard up inside the socket.
5. If you are attaching your First Flush Plus to existing 90mm downpipes, install pipe reducers into the remaining First Flush Plus tee sockets. If you are attaching your First Flush Plus to existing 100mm downpipes, reducers are not required.
6. Measure your existing downpipe and cut to create space for the First Flush Plus tee. The outlet of your diverter must sit at least 5.9” from the ground when fully assembled, so select your installation point and measure and cut accordingly. Ensure all cut edges are clean and smooth. Position your First Flush Plus T-junction in place by applying solvent weld glue to the sockets and pipe. Insert the pipe into the sockets or socket adaptors at either end of the First Flush Plus tee.
7. Apply solvent weld glue to the end coupling socket and one end of your 4" diversion chamber pipe and insert it firmly into the end coupling.
8. Apply solvent weld glue to the socket of the ball seat and the other end of your 4" diversion chamber pipe then insert it firmly into the socket and against the ball seat.
9. Attach to the wall using the supplied brackets, supporting the unit until it is fully secured. The upper bracket should sit directly under the First Flush Plus tee where it will hold the weight of the unit.
10. Place the ball inside your first flush diversion chamber through the end coupling and firmly screw the transparent, rapid release exit funnel with O-ring onto the end coupling to ensure a good seal.
11. Attach the threaded coupling to your diversion chamber pipe applying solvent weld glue to the socket of the coupling and pipe, then push together and hold until the glue sets.
12. Select the appropriate flow control washer and fit it into the hose connector with the side marked “TOP” showing. Start by using the Control Washer with the smallest gauge hole (lowest number). Try a larger gauge Washer if experiencing blockages. Save the remaining washers for possible future use. Insert the plastic filter screen in through the base of the Transparent, Rapid Release Exit Funnel and secure by attaching the hose

connector and flow control washer.

INSTALLATION INSTRUCTIONS (click here)

Save this product for later
Share by: